You may be familiar with some of the regulations governing how FAA Part 135 aircraft operators prepare for and conduct flights, but did you know that helicopter air ambulance operators have a number of special rules all to themselves under Part 135? One of these requires the pilot of any VFR flight to identify and document the highest obstacle along the planned route (§135.615). This ensures that the pilot briefs this potential hazard and determines the minimum safe altitude for the flight.
While a good safety measure to prevent collisions, the requirement has been a pain point for some operators as the somewhat vague guidance to “identify and document” is left open to interpretation. Not to mention that some methods of complying with the requirement could take up a good chunk of a pilot’s preflight preparation time, which is at a premium with air ambulance operations.
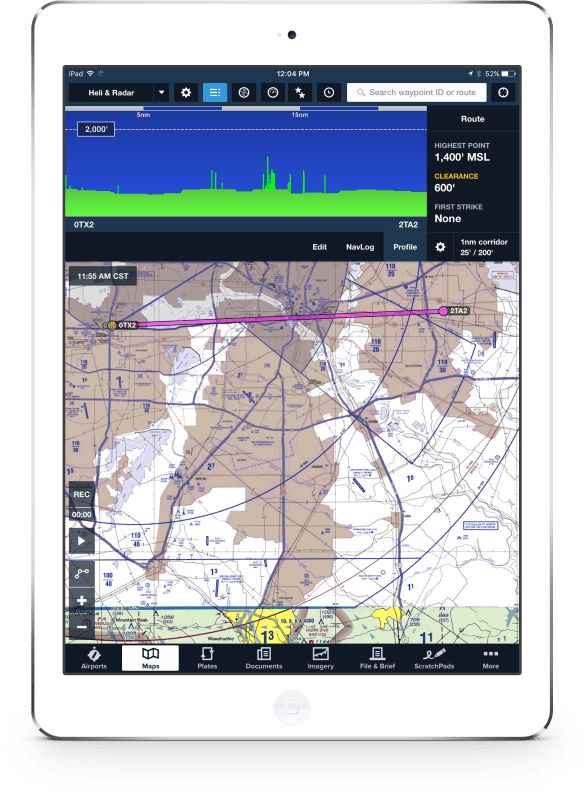
Fortunately for air ambulance operators using ForeFlight, there is a fast and easy method of complying with the highest obstacle requirement in the app itself. This method employs ForeFlight’s Profile view (available with Pro and Pro Plus subscriptions).
Start by entering departure and destination points in the Route Editor, then tap Profile to view the vertical cross-section of the planned route.
Terrain and obstacles are dynamically highlighted based on relative height to your selected altitude. Tap and hold anywhere in the Profile window (other than directly under the altitude box) and a vertical dotted line and box will appear showing that point’s altitude in MSL, the clearance in feet between the point and your planned altitude, and the distance of that point from your departure point. Dragging your finger right or left shows this information for any point along your route. The selected point is also displayed on the “top-down” view of your route below, revealing where the point is along your route.
The profile window also allows for pinch-zooming and dragging so you can unclutter nearby obstacles. You can change the total width of the corridor shown in Profile by tapping the button at the bottom-right of the window and tapping “Corridor Width” at the bottom of the popup.
Using Profile view allows the highest obstacle along a route to be easily identified. As for “documenting” it, simply place the dotted line on the highest point and take a screenshot by pressing the iPad’s home and lock buttons at the same. The screenshot can then be accessed and shared from the iPad’s Photos app, or from a cloud storage app like Dropbox.
A number of air ambulance operators using ForeFlight have shared with us how this feature helps them comply with the highest obstacle requirement. We hope this helps you, too.

