As 2022 comes to a close, we want to inspire our customers to dive deeper into some of ForeFlight’s best features and learn how they can enhance your flight planning and flying workflows in 2023 and beyond. We’ll highlight a different feature every day, so check back through December 23 to learn about all 12!
Commercial Flight Search
Use the search bar on the Maps view to find filed flight plans currently enroute or departing in the next 24 hours based on flight number (e.g. SWA123) or aircraft registration (e.g. N012FF). Tap on a result to load the route into the flight plan editor and follow along once you are airborne.
Aeronautical Map
Augment other charts like the sectional with dynamic and tappable map elements and quick toggles for easy decluttering. ForeFlight’s High Resolution Basemap and Terrain also provide detailed ground references with no other charts enabled.
Smooth Decluttering
As you zoom in and out, the Aeronautical Map automatically shows and hides elements.

Details Are Just A Tap Away
Simply tap on any Aeronautical Map element to view detailed information about it, even with other charts enabled.

Quick Filters
Easily declutter the map using these toggles for different map elements.
Not seeing these? Make sure the Aeronautical layer is enabled and check the Quick Filters toggle in Map Settings.

Embedded Airport Diagrams
Zoom in to view airport diagrams with labeled runways and taxiways and tappable hotspots and FBO markers.

More Options in Map Settings
Customize the map further with different airport types, highlight or hide airspace, switch between IFR High/Low, and more from the Map Settings menu.
Easy ways to find fuel prices
Easily find the lowest prices for 100LL or Jet A along your route and learn more with a tap.
Fuel Price Map Layers
You can view 100LL and Jet A fuel prices on the Maps view by tapping Map Layers > Fuel: 100LL or Fuel: Jet A.


The price that is shown on the map reflects the lowest price offered at that airport. Tap the prices on the map to get more details about the specific FBOs.
Airports
You can also find fuel pricing by visiting the Airports view or tapping an airport directly on the map. Tap the FBOs button to see the different fuel prices for each FBO on the right. Tap into an FBO to view all fuel types and retail prices including self-service and full-service.


Other fuel types that you will see under the FBO view include: 100LL, Jet A, Jet A+, MOGAS, UL94, and UL91/96.
We actively partner with FBOs to help them keep their listing information and fuel prices up-to-date. However, if you find the price you pay at the pump is different from our last update, you can help update the price right through the app. To submit fuel price updates, tap Update Fuel Prices from the FBO window. Enter the current price and tap Submit.


Ruler
Quickly measure the distance between two points, directly on the map, using ForeFlight’s Ruler feature.
To use the Ruler, tap and hold the map with two fingers then use those two fingers to move it into place. Pinch open to make the ruler larger and pinch close to make it smaller.
The ruler will show you the distance in nautical miles between the two points and will also tell you, based on your current or planned airspeed, how long it will take to get from one point to another.

Additionally, Pro Plus users can use Profile View to view the terrain & obstacles under the ruler’s path.
Glide Advisor
ForeFlight Glide Advisor™️ helps you quickly assess your landing options in case you ever lose engine power. ForeFlight draws a glide range ring around your ownship icon on the moving map display using terrain, GPS and wind data, and your aircraft’s best glide speed and ratio.
Setting up Glide Advisor is easy – open the Map Settings menu and enable the Glide Advisor switch. This will create a new Glide Settings item; you can manually enter the best glide speed and ratio or configure one of your existing aircraft profiles by tapping “Edit” and entering the glide values. Then tap Done and select the newly configured aircraft.


In addition to values for glide speed and ratio, Glide Advisor also requires downloaded terrain data for the area you’re in and accurate GPS position. ForeFlight will also incorporate recent winds aloft data if available, so a GPS receiver that also provides ADS-B or XM weather is ideal.
Glide Advisor will activate in flight once you climb above 200′ AGL. Over flat terrain, it approximates a circle, but in hilly and mountainous areas, it will smoothly follow the contours of nearby terrain, reaching into valleys and curving around mountains. In places such as these, pairing Glide Advisor with other terrain-based tools such as Hazard Advisor and Synthetic Vision boosts your terrain awareness even further. Using Glide Advisor in conjunction with Distance Rings can also enhance your situational awareness, especially if you need to transmit a quick position report to ATC.
Distance Rings
Enable a set of three concentric rings around your ownship on the map that display distance or time (at your present groundspeed). Tap on the labels for any of the rings to change their size or measurement unit.
Hazard Advisor
Use Hazard Advisor to find the safest route around hazardous terrain at different altitudes before or during a flight. Included in ForeFlight Pro Plus subscription plans and above.
To enable Hazard Advisor, tap the Layer Selector then Hazard Advisor.

Manually control Hazard Advisor’s altitude using the altitude slider, which ranges from 100’ to 30,000’ MSL.
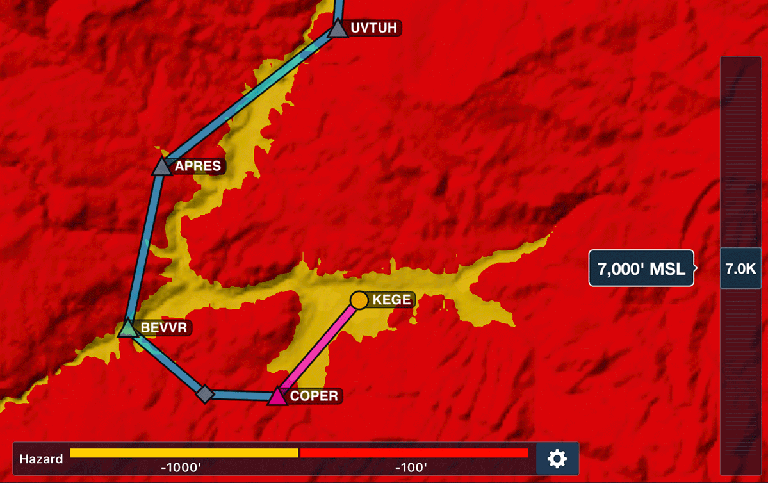
By default, terrain and obstacles within 100′ are colored red, and hazards within 1,000′ of your planned altitude are colored yellow. You can change these altitudes by tapping the gear button to the right of the map legend at the bottom of the screen and tapping Hazard Altitudes. You can also access other Hazard Settings here, such as Corridor Width and Activation Speed, which determines how fast you need to be moving to enable Auto Hazard Advisor.
3D Review
Follow planned and recorded flights from an interactive third-person view of your aircraft and route line.
To use 3D Review for a planned flight, start by adding a route to the Flight Plan editor, then tap the globe icon to view the route in 3D.

To view a recorded flight in 3D, go to More > Track Log and choose the flight you want. Then tap the 3D button on the right side of the screen.

Use the Camera Mode buttons in the bottom-left of 3D Review to switch between first- and third-person modes. In third-person mode, the camera stays centered on your aircraft, allowing you to pan, tilt, and zoom the view to see it from any angle.


In both modes, your route line appears as a blue curtain that the aircraft travels along, making it easy to see your route’s path before and after your current position.
Track Logs recorded with an AHRS-capable device like Sentry will incorporate pitch and bank data into the blue aircraft’s movements in first-person and third-person modes.
Additionally, if you tap the Layers icon, you can enable tappable Airport markers, Weather layers, and Obstacles.

3D Review is available with ForeFlight Performance plans.
Takeoff and Landing Distances for Pistons
Ensure you can safely take off and land on short runways or in high density altitude with fast runway distance calculations for supported piston aircraft. Available with ForeFlight Performance subscription plans.
To check if your aircraft is supported, tap on it in the Aircraft tab and select Aircraft Type. Your plane is supported if you see “Supports Takeoff & Landing Performance” in blue text under the aircraft type. You can view a complete list of supported aircraft here.

Next, plan a flight with the aircraft and tap Takeoff or Landing next to either airport near the top of the Flights view, then select a runway to automatically calculate and display the performance results.


In addition to editing any of the weather information to test different “What if?” scenarios, you can build additional safety margin into the calculation by specifying a Safety Distance Factor greater than 1.0. The calculation’s Total Distance result will be multiplied by this factor to produce a more conservative estimate.
Plates on Maps
Overlay taxi diagrams, approach plates, and more directly on the map to see your position on them and combine them with other powerful map and weather overlays. Plates on Maps is included in ForeFlight’s Pro Plus subscription plan and above.
There are many ways to send a plate to the map, but the easiest is to tap the airport on the map or search using the Airports tab, then tap Procedure to view all the plates for that airport. Tap the plate name directly to view it in fullscreen on the Plates view, or tap the Send to Map button on the right to overlay it on the map.

Here are some other ways to send a plate to the Map:
- From Plates – tap the Send To button in the top-right of the screen and tap Send to Map if it’s available (if it’s not available then the plate isn’t georeferenced).
- From the Route Editor – tap an airport’s bubble and tap “Show Plate” to select which plate to dispaly, or tap “Show Airport Diagram” to overlay the airport diagram on the map. With a procedure (SID, STAR, or approach) in your route, tap its bubble and tap “Show Plate” to overlay the plate on the map if it’s georeferenced – if not, the plate will open in the fullscreen Plates view.
Graphical Preflight Briefing
Easily find weather and NOTAM information for your route to make informed decisions in your preflight planning with ForeFlight’s Graphical HTML Briefing.
The HTML Briefing format is the default for most customers in the US, while customers outside the US can access the PDF version. To change your selected briefing format, visit More > Settings > Briefing Format.
From the Flights view, tap Briefing at the top of any flight.
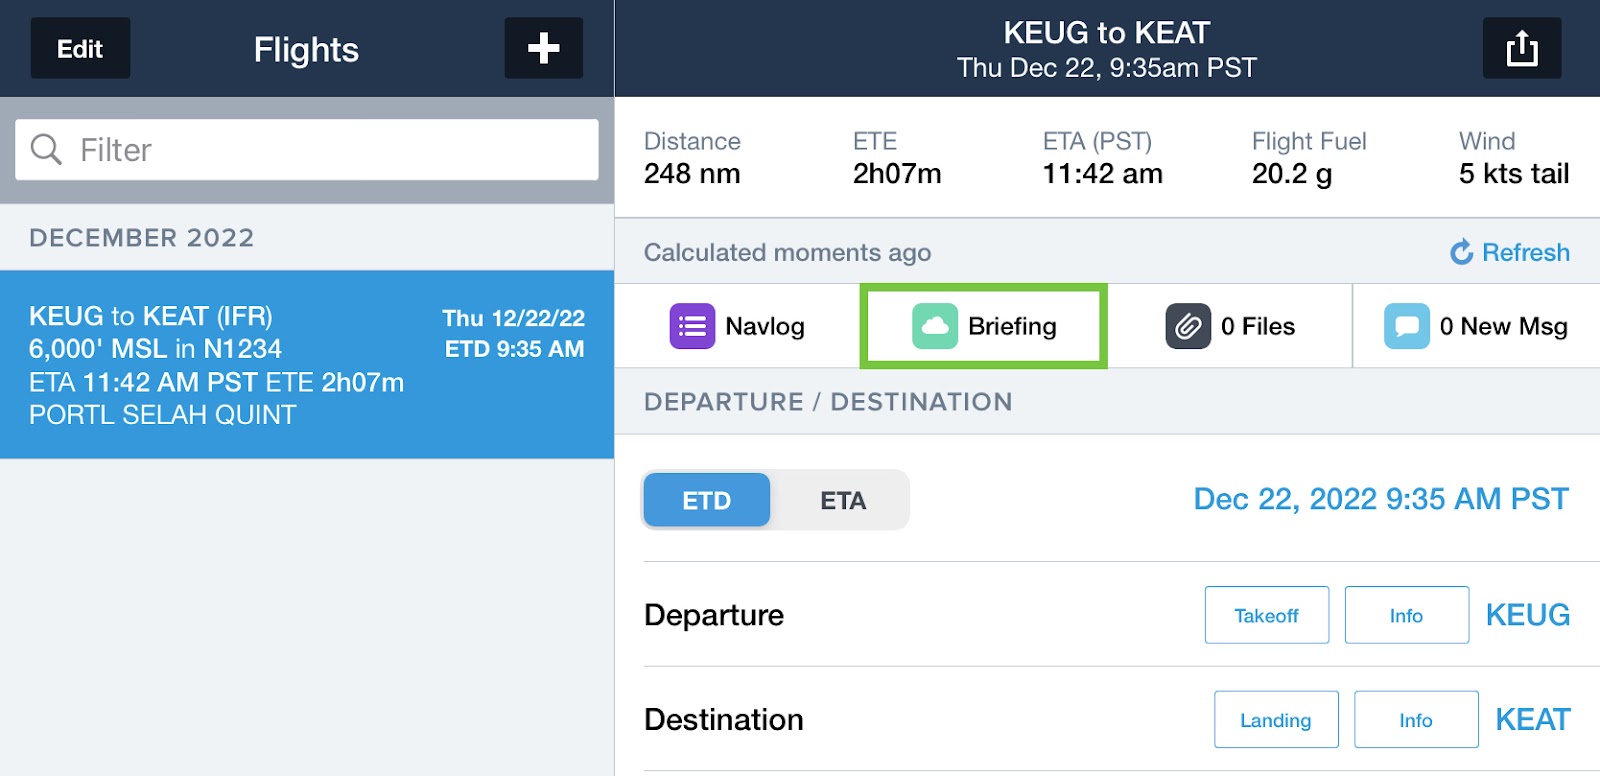
Next, you can tap the menu button in the top left to navigate. The Graphical Briefing is presented in clearly organized sections, making it simple to tap through each element of the briefing in a logical sequence.


You can view any section from this menu, and orange dots represent sections that havn’t been viewed yet. The following are included in the briefing:
- Adverse Conditions: Includes safety advisories such as TFRs, NOTAMs, SIGMETs, AIRMETs, and PIREPs.
- Synopsis: Overview of weather trends for areas that your route passes through and a surface analysis chart.
- Current Weather: Includes current METARs and PIREPs
- Forecasts: View Cloud Coverage, VIS, SFC Winds & Precip, TAFs, Wind Chart, Vertical Cross Section Chart, and Winds Aloft Table.
- NOTAMS: Shows NOTAMs for departure, destination, alternates, enroute, and ARTCC.
ForeFlight Briefings are timestamped at the bottom of your screen and stored in the app on your iPad and iPhone, and in the ForeFlight cloud, to record that you obtained weather and pertinent NOTAMs in compliant manner with 14 CFR 91.103(a) preflight action.

Flight Plan Filing
ForeFlight supports filing IFR flights to and from the US and within Canada, the Caribbean, Bahamas, and Mexico, as well as within and between all EUROCONTROL member states and Greenland using the ICAO flight plan format.
After planning a flight on the Flights view, tap the Proceed to File button in the bottom-right to open the File form. Review the pre-populated flight plan details and make any necessary changes, provide your name, phone number, and email address at the bottom, and tap File to file the flight plan with ATC. You can also view and print your flight plan using the official ICAO filing form or save it to Documents from this view using the Send To button in the top right corner.

After filing a flight plan, ForeFlight will continue to monitor your route and will notify you via push notifications of any new or updated NOTAMs, TFRs, or weather that could affect your flight.
You will also see a red badge on your Flights tab when new messages are available and you can view them on the message section of the flight.
